Tuesday, August 28, 2012

Free Pattern: Luxus Cowl

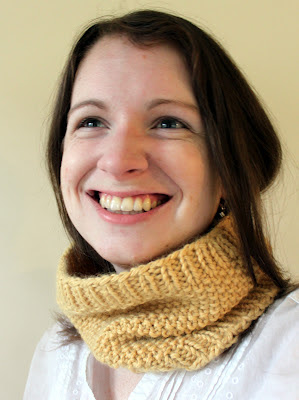
I have been in love with the yarn Misti Alpaca Chunky from the moment I first laid fingers on it. Its extreme softness and its big bulky nature were such strong attractors that my only method of self defense was remembering my grad-student budget. After ogling the yarn for the hundredth time on a recent trip to the local yarn shop, I finally afforded myself the luxury of a single skein with the intention that it would be made into something special. The result is this cowl.


The cowl was designed with two things in mind: to showcase the beauty of the yarn and to produce a big squishy cowl that uses as much of the skein as possible. With less than 2 yards of leftover yarn, I'm pretty sure I succeeded in at least one of these goals. This project is a simple, quick, and luxurious knit, and I'm looking forward to wearing this soft fabric against my skin once it gets cold. With autumn just around the corner, perhaps you should knit one too!


To make this cowl, you'll need:
- 1 skein of Misti Alpaca Chunky (108 yards, bulky weight); colorway 1110 shown here.
- A set of US 10 / 6 mm circulars or double points

The finished cowl measures 21 inches around with a gauge of 13 st/25 rows = 4 inches in seed stitch.


PATTERN:
Cast on 72 stitches. Join to work in the round, being careful not to twist.

Border:
Round 1: [K1, P1] to end.
Repeat this round 4 more times.

Next round: [K1, P1] to 2 st from end, K2tog. (71 st)

Main Section:
Round 1: [P1, K1] to 1 st from end, P1.
Round 2: [K1, P1] to 1 st from end, K1.
Repeat rounds one and two 16 more times.

Round 35: [P1, K1] to 1 st from end, P1, M1.  (72 st)

Border:
Round 1: [K1, P1] to end.
Repeat this round 4 more times.
Cast off. Weave in ends.

Questions or errata? Contact me at brineydeepdesigns_at_gmail_dot_com!

Tuesday, August 21, 2012

Sorbetto

The fun part about picking up a hobby is that every new project can teach you a different skill in that hobby; this has been especially true with my sewing. I learned a lot from making my first bag and making a semi-complex dress, but there are still whole areas of sewing that I have yet to touch. So I am out to improve my sewing skills slowly and steadily by picking up a new technique with each subsequent project.


My most recent project, a Sorbetto top, demonstrates that even a simple project can teach you a lot. One of the things I learned was how to work with a sheer and drapey fabric. For example, I needed to be much more careful when cutting and sewing, as the fabric didn't always lay nicely and required adjustments with the sewing machine's tension. I did pretty well for my first time out, but I realize that I still have work to do in this area.


The other thing I learned from this project was how to make a french seam (shown above). French seams are enclosed seams than help prevent fraying and make your seams look very tidy. I did french seams for this project because I did not want raw edges showing through the sheer fabric. Plus, there weren't that many seams to sew, which made the process of sewing french seams (which are effectively two seams in one) a manageable prospect. I think that the extra effort I put into the seams really paid off for making the top look finished.


This is my second Colette sewing pattern (my first was Peony) and I must say that I'm impressed with the simplicity and elegance of her designs, made better through clear and detailed sewing instructions. I should note that this pattern, Sorbetto, is a freebie, so it's an easy place to start if you're interested in learning more about this designer. Honestly, I enjoyed sewing both Colette projects so much that I can't wait to start my next one: a Sencha blouse.

Tuesday, August 14, 2012

All Wrapped Up

Let's not talk about the huge amount of television I've watched in the past two weeks. It's a lot. I'm not a TV watcher normally, but I make an exception for the Olympics. I can't get enough of the inspiring stories and obscure sports. Plus, it makes for great crafting time.


Wire wrapping turned out to be one of the better TV-watching crafts, and I made several pairs of earrings (my favorite are the simple turquoise drops below) and a large necklace (above) while watching the Games. As you can see from this tutorial, the basic loop--which was the foundation of all of my wrapping projects--is actually quite simple. Once you get the hang of this loop, it's no problem to whip up lots of complex-looking jewelry while watching sports.


My crafty output will certainly go down now that the Olympics are over and I'm gearing up for my last big semester of school. Still, wire wrapping is easy enough that I look forward to picking it up again in a free moment this fall. I'll keep you posted on any future wire wrapping exploits.

Tuesday, August 07, 2012

Two Ways to Fix a Pattern

Last time we spoke about my sunhat, things were not going all that well. The hat was too small for my (albeit somewhat large) head and the brim was too deep to be usable. Things obviously needed fixing and I'm happy to report that I figured out two ways to do so.


The first solution involved styling the finished hat. My friend P was over for Olympics watching/craft time and had the genius idea to fold the brim twice instead of once. The result not only worked but was super cute. Since the folds would only stay in place if pinned, I whipped up a tsumami kanzashi pin to complete the transformation.


Beyond styling, the other solution was simply to fix the pattern itself. I took 1.5 inches off the bottom of the brim, which was a compromise between still having a broad brim and being able to see below the brim. I also took 0.5 inches off the top of the brim, which added an inch to the hat size and, more importantly, fixed an error in the pattern by making the inner brim size match the cap circumference. The resulting pattern was much easier to sew and the finished hat fits me very well.


Sewing a mock-up, making pattern alterations, then sewing the final project is a standard habit in sewing; it is referred to as 'making a muslin', after the inexpensive material used for this pattern testing. In my case, I made a 'working muslin' because the first hat was intended to be wearable. Making muslins takes time but is something I definitely need to start doing as I work with more expensive fabrics. I'm just glad that in this case my working muslin turned out to be usable after all!