Saturday, December 09, 2017

Simple Knits for Toddlers

At some point this fall, the kiddo transitioned from baby to toddler. It's a pretty noticeable difference, filled with new abilities and many more opinions. It's been keeping Mama on her toes, but I've still managed to sneak in a little bit of knitting.


Most important was to get a new hat and mittens for the munchkin. We've already had lost mitten issues and he keeps outgrowing hats. (My kid has a seriously large noggin'. Case in point: his adult uncle is wearing his hat in the photo below. The result is that I knit an adult small hat for him this winter so he has a chance of being able to wear it next year too; it's a little too deep but fits just right around his head.)


Enter in the Simple Collection from tincanknits. I've recently become a big fan of tincanknits, having knit four of her patterns in the last year. Her Simple Collection is beautiful and the patterns come in a wide range of sizes. Barley and Maize where just perfect for the kiddo's winter needs.


The munchkin seems to really like his new hat. We're still working on loving the mittens, but at least I used a long i-cord to connect them together so we won't have to worry about losing one when kiddo decides to actually wear them. If you aren't aware of the Simple Collection, I highly encourage you to check these patterns out!

Tuesday, September 26, 2017

WI Sheep & Wool 2017

Sometimes I can't believe how fast the knitting time has flown. I've been knitting for 16 years, I joined the Harry Potter Knit/Crochet House Cup over 9 years ago, and, relevant to this post, I went to my very first Wisconsin Sheep & Wool in 2008.


Like that year, I enjoyed WI Sheep in the company of knitting friends. This year was a contingent of House Cuppers, including IsisOnEarth, xamonster, tangledskeing, mariacrafts, (me), and bandbabe:


I also met up with my awesome research collaborator, hedgieknits, who drove up from Chicago for the day. She wrote about the event on her blog here. Most important, she was my voice of reason this year and kept me from running rampant in the Fiber Optic booth, as I've done in previous years. (Seriously, I was carrying around three different items and she helped me leave the booth empty handed - that's strong magic.)


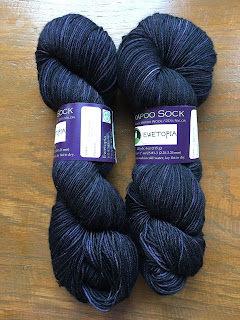
That's not to say I didn't buy anything. Hedgie introduced me to Ewetopia, where I bought 2 skeins of Kickapoo sock yarn in the most lovely kettled-dyed purple-black. I also picked up a copy of The Complete Surprise, a book about variants of Elizabeth Zimmermann's Baby Surprise Jacket, which I've been eyeing for a few months now.


All and all, it was another wonderful Sheep & Wool festival. It's been a decade of this festival and I never fail to enjoy it.

Tuesday, September 19, 2017

Serger

I got a new toy for my birthday this year - a serger! I've been doing a fair bit of sewing recently and want to work with more knits, so it was a natural time to level up. I'm super excited about it (and glad to have another Janome in the house).


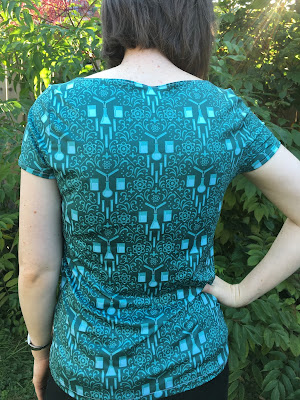
Buying a serger lets me dig into the backlog of patterns for knits, starting with the Lark Tee from Grainline Studio. I matched the pattern to 1 yard of brushed poly I bought from Zenith & Quasar in the most awesome chemistry-themed damask pattern.


Here's what I learned in my first run out:

  • Using a serger is just as easy as using a sewing machine. Actually, easier because you sew and finish your seams at the same time.
  • Be very careful to not make mistakes. I got a little nervous when setting in the sleeves (which I sometimes mess up when doing with my sewing machine) because the serger actually cuts the fabric and uses 4 threads. Mistakes will be much more costly to correct.
  • I'm glad I bought a catch tray for the cut fabric.
  • Note to self to always use compressed air to blow lint out of the machine at the end of the day to extend the life of the machine. It's amazing how much lint one project will create!
  • Related to the pattern: it is possible to make a size 8 cap-sleeve version of the Lark Tee with only 1 yard of fabric instead of the 1.25 yards specified.


The other thing I realized is that I'm still terrible at hemming my knits. Instead of using a twin needle, as in the past, I serged all of my edges, turned them up, and stitched them with my sewing machine's narrow zigzag stitch. This worked okay on the bottom hem and sleeves, but was a royal pain for the narrow neckline hem. This is something for me to work on going forward.


So my first project on the new serger is a success and I'm very much looking forward to logging more hours on this machine!

Tuesday, August 08, 2017

EZ as Pi

I've been pretty quiet on the knitting front because I've spent the last 3 months knitting this grey beauty, a 1200+ yard Pi Shawl. While this is much more lace than I can usually handle, I can now see why this Elizabeth Zimmermann pattern has been so beloved.


I did my version in MadelineTosh Twist Light in Great Grey Owl. I chose to do a simple center with yarn over's every 6 rows in between the increases, followed by an Alpine Lace edging (which looks a bit familiar to this blog). This kept the lace manageable for me, as I only had to pay attention during the very last section.


Not having knit a circular shawl before, I'm still trying to figure out exactly how to wear it. Easiest is folding it in half and wrapping it around my neck, though I've also tried folding the top third down to wear it around my shoulders. This is something I'll be playing with.


Overall, I'm very happy I persevered through my largest lace project to date. I almost didn't make it when I discovered a math error meant knitting twice as much edging as I originally thought, so I'm very glad it's finally done. Not only done, but beautiful!

Tuesday, June 13, 2017

Newsboy

I mentioned a yet-to-be-seen handsewn baby hat in an earlier post and was finally able to get kiddo to wear it for one minute so I could take a photo. Not a great photo, but for once the little guy didn't immediately take it off his head, so I'm calling it a win.


This adorable newsboy cap is another one from Sewn Hats, which is becoming my go-to book for hat patterns. I'm really sad that kiddo doesn't like this one more but it's too cute not to keep trying. Maybe one day he'll actually wear it from longer than it takes to get it off his head.

Tuesday, June 06, 2017

Summer Sewing Gone Vintage

We finally hit summer this week in Wisconsin, which means two things: 1) I need to install the window A/C units in the house, and 2) I want all my clothing, including what I'm sewing, to be lightweight. Happily I have a tank top pattern on my to-make list - the Tiny Pocket Tank from Grainline Studio (pattern no longer available) - and some leftover rayon challis from my Mojave kaftan that are just right for summer sewing.


The Tiny Pocket pattern is really simple, so I decided to make this project interesting by using my 100-year-old Singer 27 machine (which I'd yet to use for a full sewing project). Here are some initial impressions about sewing with the old machine:

  • I don't think rayon challis was the right fabric to test this machine out on, as the machine is pretty... sturdy. Sewing the rayon wasn't really a problem, but I get the feeling that the Singer will zoom through quilting cottons and wool. It's a bit more fiddly with fluid fabrics (though that may also be me getting used to the machine and treadling).
  • I'm totally spoiled by the seam allowance guides on my new machines. I'm going to have to get used to not having them on this machine.
  • Also not features on this machine: back stitch. Instead of using back stitch to anchor the beginning/ending of a seam, I: tied a lot of knots, turned my sewing around to "back stitch", and overlapped the start and end my stitches when sewing in a loop (depending on the part of the project). I still have to figure out the best way to anchor the ends of my seams going forward.
  • The Singer works a treat on long straight seams, but it's difficult to sew slowly or with many stops/starts due to the foot treadle. It was quite fiddly to sew on the bias tape around the neckline and armholes, between the fluidity of the rayon and stopping to remove pins every 2 inches.


The Singer was actually quite fun to use and the biggest challenge on this project ended up being the fact that I attached the armhole bias binding to the wrong side of the fabric. Everything worked out in the end and I'm really happy with this cheery summer top!

Thursday, June 01, 2017

Hawaiian Fern Dress

I brought 4 lengths of fabric back from my trip to Hawaii last fall, and I'm happy to report that the second length has been sewn up. The purple fern print became a Colette Hazel dress.


I chose this dress pattern to highlight the print pattern on the fabric, as the dress was designed with a border-print fabric option. While my fabric isn't a true border print, it's definitely directional with the design weighted toward the edges - something I wanted to highlight. Plus, Hazel has a dirndl-style skirt which gives an open canvas for the large print.


The thing I'm most proud of with this dress is my finishings. Once upon a time, I sewed up my seams, pressed them, and called everything done. In lucky cases, I broke out my pinking shears. I now find it very important to finish my seams to prevent fraying. I used a number of different techniques to finish seams in dress, including: overlocking, french seams, and bias enclosed seams. The exact finish depended on the construction of that part of the dress, but I think this will stand up better than some of my first sewing projects.


I've actually been waiting a few months to show this off as it's been a chilly spring here in Wisconsin. Now that it's summer, I'm looking forward to wearing this dress a lot - to work with a small suit jacket and on the weekends with a cardigan.

Tuesday, May 23, 2017

Sun hats

It's finally getting warm and sunny in Wisconsin, which means it's sun protection season for us pale people. While sunscreen is de rigueur for spending more than a few minutes outside, you may have noticed my obsession with another sun protection method - hats. I'll readily admit that this is partly an excuse to occasionally get new hats like this beauty.


The real challenge is the kiddo, who inherited my super pale skin coloring. He needs sun protection but doesn't always consent to wearing a hat. For some reason, the cuter the hat, the more likely he is to take it off. Let's not discuss his reaction to the first hat I sewed for him (which I still have to show you), but at least he seems to like the second.


A bucket hat is classic for a little boy. This pattern comes out of the book Sewn Hats (which I've used few times now) and the fabric is what I found in my stash that had enough yardage and wasn't flowery.


I made a few modifications, including:
  • I used a heavyweight interfacing for the brim.
  • I lined the inside of the crown instead of adding an interfacing and using the recommended bias tape seam finishing.
  • I added a chin strap just in case kiddo didn't like to keep this hat on his head.


Happily, kiddo likes to wear this hat and has even brought it to me and asked for help with putting it on! So now I can worry a bit less about having a toddler with sunburn. Whew.

Thursday, May 11, 2017

Nerdy York

Have you ever fallen in love with something at first sight? I think this is fairly common among crafters. We see a yarn or fabric, we covet it, and it doesn't matter that we have no project in mind because we just have to have it. This lovely flora and fauna cotton voile was definitely that type of fabric.


I've been a fan of cotton voile since I used it in my first Scout Tee and could not resist more in an amazing print. If you've never used cotton voile before, it is a lightweight and soft cotton but can sometimes look a bit rumpled after washing or with wear.


My challenge with this fabric then was to show off the amazing print while taking advantage of the fabric's properties. I put the compromise at sewing a simple silhouette. After some back and forth, I settled on Seamwork's York top with some minor tweaks:
  1. Because voile can rumple, I decided to forgo the sleeve cuffs.
  2. To avoid visually interrupting the fabric's pattern, I did not bind the neckline but instead used single fold bias tape to stabilize the inside of the neckline; this gives an uninterrupted pattern from hem to neckline. I used the main fabric for the bias binding.
  3. Due to the above modification, I could not easily implement the called-for tie at the back neck (not that I really wanted a tie), so I added a small loop of bias binding and a button to close the top back. If I remake this pattern, I might skip the back seam and closure entirely as the neckline is wide enough to go over my head.
  4. I made sure the pattern lined up at the back seam, requiring vertical adjustments of the two pieces (of less than 1 inch) and then trimming the two pieces to be symmetric. (I also made front piece have symmetry down the middle.)
  5. I took off almost 2 inches from the bottom hem for a more flattering length.
  6. I used french seams for all of the seams.

Now that I see this list, I'm impressed with my sewing ability to be totally comfortable making all of these tweaks. My more frequent sewing projects are really paying off in terms of elevating the small details in my projects. So win for my sewing skills.


Besides being happy with my sewing skills, can I just say how much I love this top? The fabric is perfect and I love how flattering the pattern is on my body. Happiness all around.

Wednesday, March 15, 2017

Mabel

One of my new year's resolutions is to sew more - at least an hour every week. Three months into this resolution, I think it's going really well as projects are getting done at a nice pace (a couple of which are gifts and can't be shown here quite yet).


This particular project has been done for about a month and has been waiting for good pictures in order to be shared - something that is surprisingly difficult when baby gets up before sunrise and goes to bed after dark.


The obvious solution is to get the baby (and the dog) in the photo! Daylight saving time is also helping.


This skirt is perhaps one of the most satisfying things I have ever sewn. I think it was the combination of a quick-to-assemble pattern (Mabel from Colette Patterns) and an easy-to-work-with fabric (ponte knit). Seriously, this thing came together with just about an hour of sewing and was one of the smoothest knitted fabric projects I've done yet. I even got my twin-needle hem to come out perfectly! Count me in as a ponte convert.


I think this is going to be a go-to wardrobe essential this summer!

Monday, January 30, 2017

A Convenient Mistake

It’s amazing to make a bad sewing mistake and then have it turn out to be exactly the modification you needed to do anyway. In this case, I’m sewing my second Scout Tee (first blogged here) and made a mistake in cutting - I cut the back piece with the fold at the side seam instead of in the middle. *headdesk*


Honestly, the problem started because I was short on yardage - the pattern calls for 1 2/3 yds and I had a 1 1/6 yd remnant. The only way I could have made all the pattern pieces fit on the fabric was by doing exactly what I did. I just did it all by accident.


The question then became how to fix things. The most obvious answer was to cut the back piece in two and make an extra seam up the middle back (and boy was I thankful I made this mistake on the back and not the front!). After that, I took 1/8” out of the side seams to make up for the extra back seam. The back looks a little odd with the big print, but the shirt still fits and is totally wearable.


After making two Scout Tees now, I'm still super happy with this pattern. There is a high probability that Scout will become my go-to shirt pattern. It's just so easy to put together and fits well. Plus, it looks great - particularly in this awesome Hawaii fabric!