My mother in law sent me this photo this weekend: my god-daughter wearing a sunhat that I sewed for her. She's such a cutie and I can't get over how adorable she is in her hat.
The hat in question is made from McCall's M4478 and fabric that I had left over from the lining of this sunhat. This hat proved that sunhats are super fun to make, no matter if they are adult or baby sized. And having sewn them in both size ranges, I could probably draft and sew one entirely from scratch at this point. Maybe I'll do that for my next sunhat (because there certainly will be a next sunhat).
Tuesday, July 30, 2013
Tuesday, July 23, 2013
Knitting by Train
One of my favorite times of the year for knitting is summer, mostly because vacation time is a great time to get some knitting done--especially if that vacation involves train travel. I'm convinced that the train is the best way to get anywhere cross country if you have the time for it. It's relaxed and comfortable and all you have to do is watch the scenery go by. In other words, it's perfect knitting time.
This year's summer vacation involved a family reunion in San Diego with my parents, my three sisters (below), and their families. It was an amazing trip, with time to hang out and play with my nephews balanced by more traditional vacation stuff like a visit to Disneyland. I came home from the trip happy and relaxed in a way that means it was a really good vacation. I think the train had a lot to do with how relaxed I felt, even from the start of the trip.
The main part of our travel to California was on the Southwest Chief, Amtrak's line that connects Chicago and LA and runs through the American west. I have several strong memories from the ride: the beauty and sparsity of the landscape as you go further west, the swaying and slight claustrophobia of the upper bunk in our sleeper, listening to a little boy despair over a forgotten stuffed animal named Nuzzle in the lounge car one evening (so adorable), and the downpour that hit right as we pulled into Albuquerque and I was finishing my first Twiglet mitt.
For all I couldn't decide what to knit on vacation until right before we left, the Twiglets turned out to be a great travel project: portable, complex but not overly so, and the perfect size to make quick progress. And I love the color of this yarn; it's Verve from The Unique Sheep in the gold colorway. It's not the go-with-everything color of my favorite Veyla mitts, but I kind of like them better for it.
All-in-all, it was a wonderful vacation and I will always think of some of the little details of the trip whenever I wear these mitts. I'm of the opinion that we put a little bit of our current thoughts and experiences into our projects as we knit them. These mitts will therefore bring happiness and sunshine to my future self, which is a happy thought indeed.
This year's summer vacation involved a family reunion in San Diego with my parents, my three sisters (below), and their families. It was an amazing trip, with time to hang out and play with my nephews balanced by more traditional vacation stuff like a visit to Disneyland. I came home from the trip happy and relaxed in a way that means it was a really good vacation. I think the train had a lot to do with how relaxed I felt, even from the start of the trip.
For all I couldn't decide what to knit on vacation until right before we left, the Twiglets turned out to be a great travel project: portable, complex but not overly so, and the perfect size to make quick progress. And I love the color of this yarn; it's Verve from The Unique Sheep in the gold colorway. It's not the go-with-everything color of my favorite Veyla mitts, but I kind of like them better for it.
All-in-all, it was a wonderful vacation and I will always think of some of the little details of the trip whenever I wear these mitts. I'm of the opinion that we put a little bit of our current thoughts and experiences into our projects as we knit them. These mitts will therefore bring happiness and sunshine to my future self, which is a happy thought indeed.
Wednesday, July 10, 2013
Yet Another (Ysolda) Hat
Though I've knit a mountain of items since I first picked up the needles, a few finished objects stand out above of the rest for their beauty and wearability. One of them is my Veyla mitts (which were tragically lost and then reknit) and another is a Gretel hat that I made for a friend. Gretel has now followed in the footsteps of the Veylas and has been reknit, this time for myself.
The Gretel I made for myself is almost identical to the one I made for my friend. The yarn is different, Brown Sheep Nature Spun Worsted instead of a yarn I bought at the farmers market, but still a close match. I don't know what it is about this grey color, but I really love it in handknits.
I realized the other day that this is the 6th Ysolda hat pattern that I have made (one, two, three, four, five), meaning that I'll have a lot of hats to choose from come wintertime. Somehow, I think that I'll be reaching for my Gretel more often than the others.
So now I have yet another hat to wear. At the rate I'm going, I'm going to be buried in a mountain of hats soon--Ysolda knit hats for the wintertime, big sunhats for the summer, and store-bought structured hats for the times in between. One hat at a time, I'm determined to bring hats back into fashion.
Tuesday, June 18, 2013
Quilt Shop Hop
While recent blog posts attest to the fact that I've been logging a lot of time at my sewing machine, I am by no means a quilter. This is evidenced by the fact that the one quilt project I actually started is still languishing in the corner waiting to be finished. Despite my mixed success with quilting, I've discovered one thing I really love about the hobby: the quilt shop hop.
The Wisconsin State Quilt Shop Hop is currently taking place until the end of the month and I participated this past weekend in conjunction with the (extended) extended family: my brother-in-law's girlfriend, her mother, and my mother-in-law. The premise of the hop is to visit stores statewide in order to shop and participate in shop hop activities. The later includes getting your shop-hop passport stamped, buying special shop-hop quilt-square kits, and entering into drawings.
Despite not being a quilter, I really enjoyed touring the fabric stores and even came home with a few items. I got:
And though it's cheesy to say, the best thing I came home with is honestly the inspiration to get sewing!
I really had a lovely time with the ladies and would definitely do another shop hop in the future. Since we visited 5 stores near Madison--Stitcher's Crossing, Saving Thyme, J.J. Stitches, Mill House Quilts (first photo), and Village Creek (above)--I think next time I'll hop in some shops near Milwaukee.
The Wisconsin State Quilt Shop Hop is currently taking place until the end of the month and I participated this past weekend in conjunction with the (extended) extended family: my brother-in-law's girlfriend, her mother, and my mother-in-law. The premise of the hop is to visit stores statewide in order to shop and participate in shop hop activities. The later includes getting your shop-hop passport stamped, buying special shop-hop quilt-square kits, and entering into drawings.
Despite not being a quilter, I really enjoyed touring the fabric stores and even came home with a few items. I got:
- a pattern book to make 4 placemats and a table-runner using yardage and a charm pack
- two lovely fleece fat-quarters (to be gloves using McCall's 6450)
- some laminated fabric (to be a rain-proof hat)
- an embroidery stitch guide
- a small bag kit that uses this mini charm pack
And though it's cheesy to say, the best thing I came home with is honestly the inspiration to get sewing!
I really had a lovely time with the ladies and would definitely do another shop hop in the future. Since we visited 5 stores near Madison--Stitcher's Crossing, Saving Thyme, J.J. Stitches, Mill House Quilts (first photo), and Village Creek (above)--I think next time I'll hop in some shops near Milwaukee.
Tuesday, June 11, 2013
Game-Day Knitting
I'm not much of a baseball fan, but sometimes I think that knitting and baseball are a match made in heaven. I mean, I can't knit without watching something and I can't watch baseball without doing something with my hands, so it's really a perfect combination. And when you throw in a Gretel hat-in-progress and a dominant Brewers win, then you have a great day at the ballpark.
The Gretel hat in question may look familiar, as it's inspired by the one I'm wearing in my avatar. I sometimes think of that hat as 'the one that got away', as I was in love with it but gifted it to a friend. Thankfully, I'm finally making one for myself. Because I obviously do not have enough hats.
Tuesday, June 04, 2013
The Problem of Pins
While making my new Peony dress last weekend, I noticed that I don't have a very good way to deal with pins as I sew. I obviously have a pincushion, one of the old-school tomatoes, but it's not possible to pull a pin out and stick it into the cushion without stopping my sewing momentum. Dealing with pins is currently a two-handed job, one holds the cushion and the other the pin.
It's seems to me that a pincushion mounted to my wrist may work better for me, as it would only require one hand to put the pin in the cushion. I'm willing to give this new cushion type a try, especially because I had an urge to do a little embroidery this week.
To put the cushion together, I used two 3" square pieces of felt and embroidered one of the pieces using lazy daisies, french knots, and split stitch. I then machine-sewed the two felt pieces most of the way around with a 1/4" seam allowance, simultaneously sewing both ends of a 1/2" strip of elastic in place. I turned the felt right-side-out, stuffed the cushion will Polyfill, and hand-sewed the hole closed. Voila! Pincushion!
I'm not sure how easy this pincushion will be to use at my sewing machine, mostly because I made the elastic too short. It is definitely not comfortable to wear it around my wrist, though it may work to wear it around my fingers as shown above. We'll see how useful it ends up being when I sew up my next project!
Thursday, May 30, 2013
The Little Things
There is nothing better than a 3-day weekend full of friends, good food, and a doing the small things that make you happy. For me this weekend, that included baking a bienenstich (a German cake that is my new dessert obsession), playing Mario Kart Wii, and logging some time on my sewing machine.
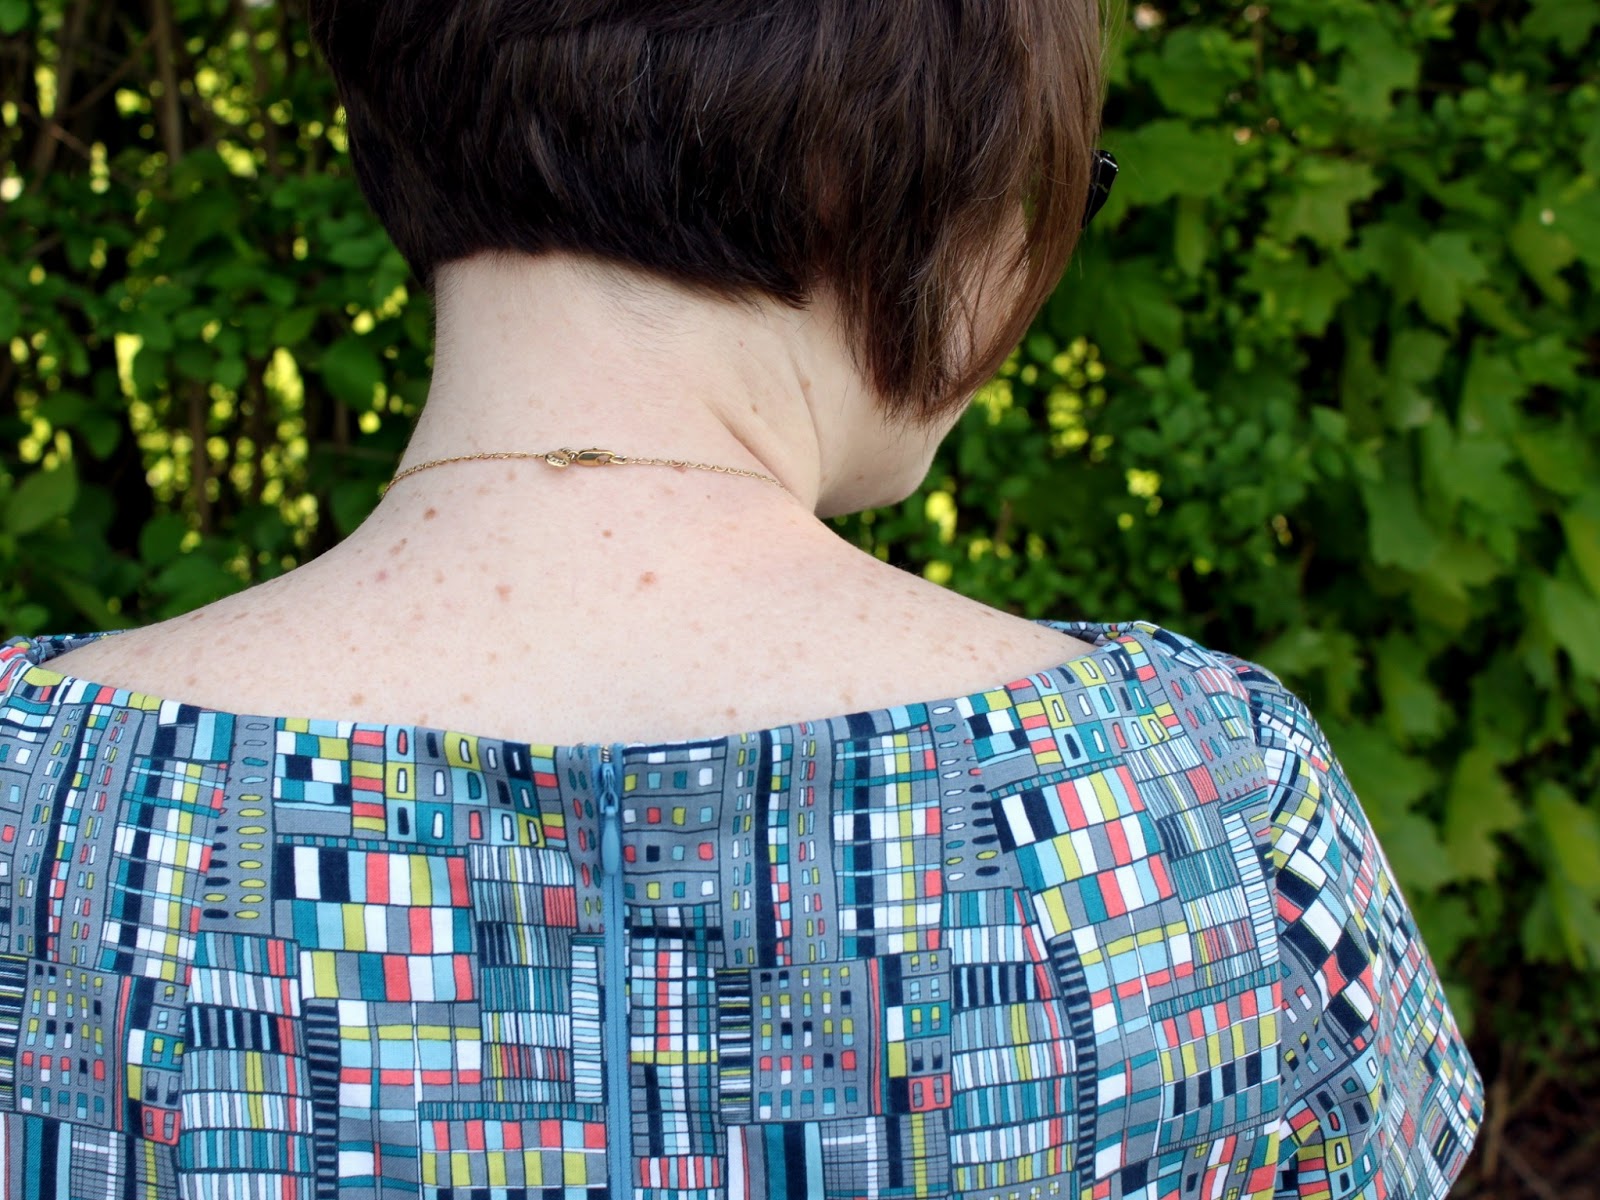
On the sewing front, I finished a Peony dress. This is actually the second time I've made this pattern (the first Peony is blogged here), but it's such a classic silhouette and a straightforward pattern that I'd be happy sewing 100 Peonies. This time, I changed it up with a fun print and short sleeves.
I'm still having trouble with zippers. I've finally gotten over my confusion about inserting an invisible zip (Colette's invisible zipper tutorial helped) and am now working on inserting one, well, invisibly. You can see below how the blue zipper tape shows down the back of the dress. I think the key is ironing the zipper flat before sewing to put the seam line as close to the edge of the zipper teeth as possible. We'll see how my next invisible zip goes using this trick.
The zipper exemplifies where my current sewing skills are: I feel comfortable with a lot of the techniques of sewing, but I'm still working on the small details of the execution. For example, I'm not fazed by bust darts but need to remember that there is bust awkwardness if you accidentally end them in the wrong place (ask me how I know that one). So yeah, good with the mechanics, need to work on the execution.
It's not that my execution is bad, it's just that getting the details right is one of my goals going forward. In the meantime, I'm creating clothing that I love and am happy wearing. This dress is definitely in both of those categories.
Subscribe to:
Posts (Atom)