Saturday, February 28, 2009

Rippling Away The Blues

Thank goodness it is the end of February. While it is the shortest month, it always seems to be my least favorite. Poor February, it can't help its place as the last full month of winter--the month that everyone gets sick of the cold and just plain sick. The combination of cold and snow, along with a busy work schedule, gave me the February blues this week. Though it turned out to be nothing that a little sunshine, a mug of tea, and cozying up in my ripple blanket couldn't cure.


I made this little afghan almost two years ago, when the ripple craze swept the internet. At that time, it seemed like you couldn't look at any crafter's blog without seeing yet another of these afghans. As the pattern was so simple and yielded such cute results, I could not help but start one myself. For yarn, I used blue and green oddballs and scraps from my stash. Unfortunately, I only had enough to make a small lapghan, though it has served me well enough over the past two years.

So there I was this morning, sitting on the couch underneath my big picture window soaking up the sun--just me and my small ripple (and the mug of tea, of course)--when I realized that I must have accrued more blue and green yarn scraps in the two years since I worked on this blanket. A little digging through my scrap bag proved this to be true and I decided it was time to expand the ripple into a properly sized afghan.


I don't know how much farther I will get on this before my current yarn runs out. It is possible that this will become the never-ending project, usable but always waiting for more yarn to be truly finished. I do know that I am really enjoying to crochet each additional stripe; it is an easy pattern and the frequent turns keep it entertaining. So even if I do run out of yarn a while from now, it promises an enjoyable crochet experience in another two years.

Sunday, February 22, 2009

Spun Spun

I spent a few nights on the spinning wheel since my post two weeks ago and spun up both the warm and cool groups of roving. Though the two groups of roving were similar in make-up (consisting of light, medium, and dark blues and purples), I ended up two skeins that do not look very related.


For the warm skein I worked the purples and blues into separate singles; each starting with the lightest shade and becoming progressively darker. I also threw in a little angelina to add some sparkle. I think that the plied yarn is quite beautiful, though it is a little difficult to see the color progression.


For the cool skein, I also did a color progression, but in a slightly different way. I spun all of the fiber into one single that started light purple, got darker, turned blue, then got lighter again. I then plied this with sequins and sewing thread. This is a technique that I am sure to use again, as I had a lot of fun putting this yarn together!


Now that the spinning is finished, I realize that I'm only halfway done with this challenge. My next step is to come up with a knitting project that highlights the character and color shifts in this yarn. I estimate each skein contains only 100 yards of worsted weight, so things can only get more interesting from here!

Saturday, February 14, 2009

Messenger Owl

Having already discussed my mild obsession with Harry Potter, it may not surprise you that I will be employing an owl to deliver all of my love notes today (Valentine's Day). Muggle post simply cannot be trusted with such an important task. Instead of dealing with the hassle of the live version, however, I decided to go with a little amigurumi owl based on the pattern found here. She may not be the largest owl, but she certainly makes up for it in cuteness.


The drawback is that she cannot be trained to carry letters like a normal owl, i.e. using mice. After a day or two, though, I discovered that whispering a few kind words into her ear will get you in her good graces. At this point she will open her beak, allowing you to put your letter inside.


Unfortunately, she has absolutely no sense of direction whatsoever, so I fear that I will be delivering all of my love notes by hand this year.

Saturday, February 07, 2009

Spin Spin

Although I own a spinning wheel, I would not consider myself much of a spinner. When I do spin, I'm the kind who likes to start the wheel and just see what happens. So when the spinning bug hit this week, I decided to hedge my bets and pick some fun colored roving, as well as some interesting add-ins. I have some roving in blues and purples--organized into warms and cools--to which I'm adding beads, sequins, angelina, and sewing thread:


I don't have too much of a plan for how I will spin this, but it certainly promises to be fun!

Sunday, February 01, 2009

Obnoxiousocks

The obnoxiousocks are finished! For how worried I was at how they would come out, I'm pretty happy with the results.


My biggest concern was how the colors would pool, and while the socks are quite vibrant, the pooling adds interest without being busy. The stitch count was obviously just right, as the colors aligned every-other-row and were balanced. The vivid pink was always pair with the calm purple, the orange paired with the brown, and the yellow-green paired with the blue. The result was that only one color dominated at a time, allowing your eye to follow swirls of color up each sock.


As these socks do not have any Nylon content and are 100% wool, I don't foresee heavy wear outside of the house. But for those cold Wisconsin nights when I am curled up at home, you will probably find me wearing some bright and obnoxious socks.

Friday, January 23, 2009

Tutorial: Jog-less Stripes

To go along with my recently self-published pattern, Walking Stripes, I put together a basic tutorial on how to achieve jog-less stripes in the round. This tutorial will demonstrate a four-color stripe, though it is relatively easy to change this number once you understand the concept.

For this tutorial, you will need:
*Four balls of yarn of the same weight in different colors
*5 dpns (or a long circular needle for magic loop) in the corresponding size


To start with, cast on the desired number of stitches in your main color (MC). I cast on 48 stitches, which is a nice multiple of 4 colors and 3 'buffer' stitches (explained later).

Work a short cuff; this gives a little smoother transition into the striped section. I knit a *K1,P1* rib for about an inch.


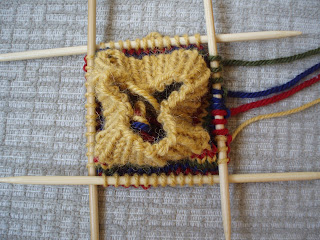
Now you will begin to set up your striped section. Knit the first 25% of the stitches in MC--in my case this fraction is 12 st. Pick up contrast color 3 (CC3) and knit the next 25% of the stitches in CC3. Knit the subsequent 25% in CC2 and the last 25% in CC1. Your needles should look something like this:


Rotate the work until you find the tail of CC2. You are now going to layer CC2 above the stitches you just made with CC1. Using CC2, knit into all but the last 3 stitches in CC1. These are the 'buffer' stitches for CC1 which will keep the stripes from jogging. In my case, I simply knit my next 9 stitches in blue from where I dropped the tail, as if no other strange things were going on.


Find the tail of CC3. Knit into all of the CC2 stitches, leaving the last 3 as buffer stitches. You should now have 3 buffer stitches in CC1 and another 3 in CC2. In my case, I picked up my red tail and knit 18 stitches, slipping the next 6 buffer stitches to give:


Finally, grab the tail of MC and knit into all of the stitches of CC3, save 3. This will leave you with 3 buffer stitches in each color, with the remainder of the stitches in MC. In my case, I knit 27 stitches in yellow and slipped the next 9 buffer stitches out of the way.


If you look carefully, you can start to see the stripes accumulating.


Now you are ready to work your stripes. Starting with CC1, knit over all of the MC stitches except for the last three. You should have 3 stitches each in CC2, CC3 and MC, with the rest being CC1. For me, I knit 36 stitches in CC1, slipping the 9 buffer stitches out of the way.


Repeat this process for CC2, CC3, and MC, in that order. You may notice that after knitting these 4 rows, you have not made a complete circuit around the needles. By not working the entire round and leaving a few 'live' stitches in each color, you essentially prevent the your stripes from jogging. All of my buffer stitches have ended up one needle to the right of where they started 4 rows ago.

Laying your work flat, the stripes really start to appear.


Work the last four rows as many times as you desire, layering each stripe on top of the previous until you work is at the desired length.


To end the striped section, you will work the set-up in reverse. Knit CC1 as during the striped section. Pick up the tail of CC2 and knit into CC1. However, this time you will leave 25% of the total stitches (12 stitches in my case) as CC1 buffer stitches instead of the normal 3. Pick up CC3 and knit, leaving 25% of the stitches as buffer CC2. Repeat this for MC. This will leave you with a quarter of your stitches in each color, as in the beginning.


Work one complete round in MC, knitting over the buffer stitches of all the contrast colors, thus ending the striped section. Cut the tails of the contrast colors. Work another cuff at the end, if desired. I did another inch of *K1,P1* rib to mirror the beginning.


Cast off. Before you weave in the ends, pull the tails (both the beginning and ending) of the contrast colors snug, as this will give a smoother transition into the striped section. Finish as usual.

Questions or comments? Contact me at brineydeepdesigns_at_gmail_dot_com!

Saturday, January 17, 2009

Andy's Scarf

In addition to working on my vibrant knee-high socks--which I am terming the obnoxiousocks--the other project that has been keeping me busy is a scarf. A Christmas scarf for darling husband to be exact. Even though I just finished his sweater in December, he really was in great need of a new scarf. So, I put two skeins of Cascade 220 under the Christmas tree and enjoyed a couple weeks of knitting for myself in the meantime.


For the pattern, I chose a simple 8 row basket-weave; interesting to knit but not too feminine. About 6" into the scarf, however, it started to curl (damn!), and by the time I was done, the scarf looked like a palmier cookie (double damn!). So I did something I've never done to a piece of my knitwear--I ironed it.


As you can see from the pictures, the ironing worked out really well. The scarf is flat and even the pattern looks better. As long as you are careful (medium heat, moderate steam, and using a fairly light touch), I'm now of the opinion that ironing actually works better than blocking for some knitwear. But finishing aside, I just hope that my husband likes the scarf and it will keep him warm during the frozen Wisconsin winters.