Showing posts with label Tutorial. Show all posts

Tuesday, August 21, 2018

Modifying a Bra Pattern for Nursing

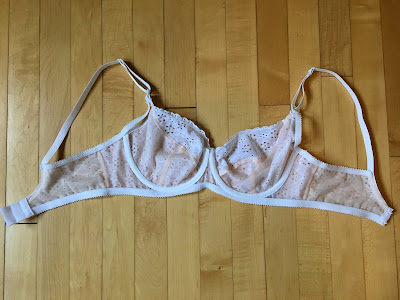
I've been making a pile of nursing bras recently, which is a great excuse to give into my bra-making obsession. I'm not actually using a specific nursing bra pattern but rather modifying bra patterns I already have (both wired and soft). This is not actually a difficult modification and I thought it would be worth walking through the steps in case someone else wants to sew their own nursing bras.


The main thing you need to sew a nursing bra is a pair of special maternity bra clasps (I got mine from Sew Sassy, where they are available in white, black, and beige). I matched up the width of the clasp to the width of my strapping, which works fairly well though is a little wide on top. The clasps replace the rings that usually connect the cups to the straps at the front of the bra (shown below).

Clasp in place of a ring connecting cup to strap

There are three spots to connect the bra to the maternity clasp: 1) at the top of the clasp base, 2) at the bottom of the clasp base, and 3) on the piece that snaps onto the front of the clasp. The straps connect to #1 and the bra cup to #3 (allowing you to freely drop the cup for nursing), but you'll need to do something extra about #2. If you don't do anything with spot #2, the strap will fly away free when you unclasp to nurse and it will be a royal pain to get everything connected again.

Bra inside, showing both ends of the anchoring elastic

The key is to connect spot #2 to the cradle, which won't interfere with nursing and will anchor the strap for when the cup is released. I do this using a short piece of edging elastic, connecting one end of the elastic to spot #2 on the clasp and the other end to the top edge of the cradle, just outside of the cup-cradle seam. It's very little extra sewing (a straight stitch to attach the elastic to the clasp piece and a zigzag to anchor the new elastic to the underarm elastic) and makes for a working nursing bra.


The one thing I don't like about this modification is that the new elastic often peeks out from under the side of the cup. But this is a small issue compared to having a working nursing bra.


One last thing to take into account is that you'll want to make your nursing bra in a larger size than you usually wear. I've been going up one cup size while leaving the band size the same, which fits me at the moment (but may be too small for when I'm producing a lot of milk). I don't have a perfect answer for what size to make, other than it at least needs to be larger in the cup than your usual size.


I've used this modification successfully on the following patterns: Cloth Habit Harriet (shown here), Cloth Habit Watson (demonstrated in this post), and Madalynne's Barrett Bralette (demonstrated in this post). I'm also happy to say that this Harriet bra was much more successful than my first Harriet, which had sizing issues. The first was a 34D and too tight around the band, so I went up to a 36C and then added a cup size for nursing, leading me to make 36D. The 36D fits great and the pattern was much smoother to assemble the second time around.


So there you go, some notes on how to modify a regular bra pattern to allow for nursing. I hope that they help other people experience the joy of sewing your own nursing bras!

Tuesday, May 06, 2014

Tutorial: Butterfly Headpiece

It's no secret that I love hats. I often find myself perusing hats on Pinterest and on one of my favorite blogs, the Royal Hats blog. While I'm more of a true hat person, I can't resist the occasional headpiece and a recent offering from this Etsy shop got me hankering to try making a headpiece for myself. The result is this kaleidoscope of butterflies.


All told, the headpiece was easy to make and very inexpensive, costing me roughly $5 and an hour of time. Since it's such a fun piece of headwear, I thought it worth sharing some notes so you can make one yourself.


Here are the supplies you will need to make this butterfly headpiece:
- 6 feather butterflies affixed to wire (Oriental Trading, $4.25 for 6)
- Metal headband (Oriental Trading, $4.25 for 6)
- E-6000 glue
- Needle-nose pliers
- Small wire cutters


To start assembly, we'll set two butterflies "flying" an inch or so above the headband to give the piece dimensionality. These butterflies will be on the side of the headband, about 2-3 inches down from the top of your head with some space in between each butterfly. Use a mirror to be ensure placement is visually appealing.


To affix a butterfly, wrap its wire several times around the headband, leaving about an inch of wire between the butterfly and the wrap to suspend the butterfly above the headband. Once securely wrapped to the headband, wrap the tail of the wire several times around the suspension end of the wire to secure it. Cut with wire cutters and use needle-nose pliers to tamp down any sharp ends. Apply glue to the wraps and use a toothpick or pin to push glue in between the wraps and the headband for a better hold.


Remove the wires from the remaining four butterflies, as we'll affix each butterfly directly to the headband with glue. The butterflies should be crowded together, with variations in orientation and angle. Again, use a mirror to check for visual appeal before gluing the butterfly body (not the wings) directly to the headband. There is no right way to do this, so just go with what looks best.

The glue takes a day or two to dry, after which you'll have a lovely butterfly headpiece to wear out into the world.


I'm really looking forward to wearing mine, especially because it's finally spring in Wisconsin!

Tuesday, November 05, 2013

Dress Upgrades

I have a bit of a dress obsession. I wear them regularly and they are one of my favorite things to sew. But for all I've filled my closet with dresses, I've come to realize that my favorite dresses have 2 features: pockets and bra keeps.

Variety of bra keeps in my off-the-rack dresses

Dresses with pockets need no explanation for their awesomeness, but you may be asking 'what the heck are bra keeps'? Well, they are the little ribbon/snap combo that you sometimes find inside the bodice of a dress at the shoulder seam. Bra keeps make sure that your bra straps stay hidden beneath the dress, which is especially useful for sleeveless dresses and those with wide necklines.

Handsewn bra keep in my Colette Peony dress

You're more likely to find bra keeps on high-end dresses, though one of my Gap dresses has them and all of my dresses from my new favorite dress shop, eShakti, have them as well. Once I realized how useful bra keeps are, I decided that my handsewn dresses should have them too. They're particularly needed on my two Colette Peony dresses (one, two), where my straps are either visible or off my shoulders trying to work around the wide boatneck.

Bra keep making supplies

To add bra keeps to my Peony dress, I used the following materials:

  • 3/8-inch wide ribbon
  • Size 2/0 sew-on snaps
  • Needle and thread

I constructed the keeps as follows:

  • Cut two matching pieces of ribbon of 2 to 2.5 inch length.
  • Fold each end down 3/8 inch and sew into place.
  • Sewn one side of a snap onto one end of each ribbon.
  • Sew the snap-less end of the ribbon down on the inside of the dress near the shoulder.
  • Sew the other side of the snap onto the inside of the dress near the neckline, making sure the ribbon lays flat when the snaps connect.
  • To use the bra keep, lay bra strap over ribbon and snap the keep shut. Straps should stay within the keeps all day.


Open bra keep

Doing all of the sewing by hand, it took me between 1-2 hours to assemble and install the keeps in my dress. But it was definitely worth the time and effort because I no longer have to fight my bra straps while wearing this dress. So hurray for bringing more bra keeps into the world!

Tuesday, December 07, 2010

Yogurt 101

I'm doing a little experiment today, not only in the form of this blog post as a pattern plus recipe but also an experiment in microbiology--culturing milk to make yogurt.

It's worth making your own yogurt for two reasons: (1) it is fairly easy and inexpensive to make yogurt at home and (2) yogurt has a number of health benefits. Milk becomes yogurt by encouraging friendly microbes to multiply and breakdown lactose and other molecules in milk. To do this, you simply combine a small amount of yogurt (from the previous batch or from store-bought yogurt) with milk and heat everything up to encourage the microbes to grow.


So how does this all relate to knitting? Well, the yogurt/milk mixture needs to be kept warm for several hours during the culturing process. Wrapping a towel around the culturing container is one way to keep the liquid warm, but as a knitter I find the idea of using a jar cozy to be much more appealing. Both in terms of the cozy-factor and the cute-factor.


My Yogurt 101 lesson goes through both how to make yogurt in a standard one-quart canning jar as well as how to knit a cozy for that jar to help with the culturing process. Do try this at home!

Making the Yogurt
Using directions from The Curious Cook


Ingredients:
1 quart whole milk
2 Tbsp store-bought or homemade yogurt


Recipe:
Slowly warm milk to just below boiling (180-190 F), being careful not to scorch it. Allow the milk to cool to 115-120 F. Whisk in yogurt and pour mixture into warm one-quart canning jar. Cover jar with cozy and let sit undisturbed for about 4 hours or until the yogurt sets up. If you want your yogurt to be thicker, strain it through a cheesecloth. Store yogurt in the fridge.

Making the Jar Cozy


Requirements:
- 75 yards Cascade Eco Wool (or another bulky wool yarn)
- Set of five US size 10 [6 mm] dpns

Gauge:
15.5 stitches and 22 rows = 4 inches in stockinette

Pattern:
Cast-on 48 stitches. Divide stitches evenly over 4 needles (12 stitches per needle).
Join to work in the round, bring careful not to twist.

Work in [K1, P1] rib for 2 inches.

Work in stockinette (all knit) for 5 inches.

Decrease for bottom as follows;
Work [K to last 2 stitches on needle, K2tog] a total of 4 times.
Repeat this row 9 more times until 8 stitches remain.

Break yarn and pull end through remaining stitches.
Weave in ends, put jar into cozy and make yogurt!

Tuesday, February 23, 2010

Tutorial: Dyeing With Turmeric

Every time I hear my friends on Ravelry talk about dyeing, I get a little bit jealous. I have visions of myself making beautifully colored skeins and rovings, but perhaps my final year of graduate school is not really the time to take up a new hobby. Plus, dyeing requires an investment in separate equipment if you want to do it safely. So I opted for an easier method for my one-time dyeing experiment: dyeing with food.


The advantage of dyeing with foodstuffs is that, as long as you don't use potentially toxic mordants, you should be able to use equipment you have lying around your kitchen. A disadvantage, at least in the case of turmeric, is that the results are not colorfast. But for a simple, safe, and fun first attempt at dyeing, turmeric produces lovely results.

Here is what you will need:

* Yarn (I used KnitPicks Bare Laceweight)
* Turmeric
* A large bowl
* A large pot

That's it!


First, you need to make your dyebath. Fill the pot 3/4 of the way full with water. Add the turmeric; I used 2 tsp of turmeric on 4 ounces of wool, which gave a nice buttery yellow shade. Bring water to a boil and let simmer for 30 minutes to extract the color.


Take the dyebath off of the heat and let it cool down to room temperature. While the dyebath is cooling, place your clean, undyed yarn in a large bowl filled with lukewarm water. You want it to wet completely through, which will take about an hour.


Once your dyebath is cool and your yarn thoroughly wetted, put the yarn in the bath. Let it soak overnight, turning it every once and a while to ensure that the dye is distributed evenly.


Remove the yarn from the bath and rise several times until the water runs clear. Wash the yarn with a gentle soap or wool wash.


Enjoy the beauty that is yarn hand-dyed BY YOU!

Tuesday, November 17, 2009

Tutorial: Mini Page-A-Day Advent Calendar

One of the holiday traditions that I love, but can never get my act together in time to make, is the advent calendar. The calendar embodies the idea that Christmas is not just a day, but a season, and offers a little treat to celebrate every day of it. Even if the treat is only a terribly waxy piece of chocolate, I still get a kick out of opening the little doors and discovering what is inside.


This year, I'm planning ahead and actually making an advent calendar for the husband. Since I don't have time to make something big and intricate (such as this gorgeous creation), I opted for a simpler design: a small scale, page-a-day-type calendar. With the help of a craft punch and some padding compound, this calendar came together quickly and has customized treats for the husband (because he, unfortunately, does not appreciate waxy chocolate). I'm looking forward to seeing his response each day as he rips off the top square to get a new little surprise!

Whether you add surprises to the calendar or not, the mini page-a-day design is an easy and small way to count down to Christmas. And I hope my tutorial shows you that it's not too difficult for you to put together yourself!


MINI PAGE-A-DAY CALENDAR

Supplies:
A sheet of red cardstock
A piece of cardboard
1 inch square craft punch
1/3 inch numeral stamps
An inkpad
A pen
Padding compound
A brush
Adhesive magnet
A rubber band


-Cut 26 squares out of the cardstock using the craft punch. Set one aside for later.

-Cut one square out of the cardboard. Set aside.


-On one side of the red squares, stamp the numbers 1 through 25.


-On the other side of each square, write that day's surprise. It can be anything from treating the recipient to a mug of french press coffee (or hot cocoa) to renting their favorite Christmas movie. Small presents always go over well, but there are plenty of ideas that won't cost you anything extra: making a special dinner, free reign with the TV remote for an evening, doing their daily household chores for them, etc.

-Make a list of each day's surprise, so you don't forget and can prepare anything special ahead of time.


-Assemble the calendar, stacking from bottom to top: the cardboard square, the red squares from #25 to #1, and the extra red square. Wrap the pile with a rubber band.

-Paint the padding compound onto the top edge of the stack, making sure to apply it all of the way to the edges. (I inevitably get compound on the front of the top red square, which is why I suggest adding the blank square.)

-Prop the stack upright and let dry for at least 30 minutes.

-Apply a second coat of padding compound. Again, let dry for at least 30 minutes.


-Tear off the top blank square.

-Stick the magnet to the bottom of the calendar, adhering it to the cardboard square.

-Give it to the recipient on December 1st and watch their face light up each day as you give them a special gift.

Saturday, September 19, 2009

Two Tips For Taking Better Photos

Since I'm currently doing a photography project on my blog, I thought it would be helpful to go over how I process my photos. There is a reason that some of the most-favorited projects on Ravelry are some of the best photos, and all it takes is an extra minute to set-up and process a picture to make it really pop. I don't promise to be an expert in this area, but these are two very simple things I do to really improve my photographs:
  1. Take photographs in natural light. Otherwise, learn to use your camera's white balance feature.

  2. Use photo editing software, such as Picassa (which is free and easy to use) to post-process all photos. In Picassa, I usually use the 'I'm feeling lucky' button and almost always increase the 'fill light' to make my photos really shine. 'Crop' and 'straighten' are also nice features.

Since I don't own the world's best camera (I use a decent point-and-click with an optical zoom), I find that a couple minutes work before and after I take the photos makes a huge difference. I've taken a couple pictures to show the improvement these small steps can make:

WHITE BALANCE

Photo taken in fluorescent lighting with no white balance, no editing

Photo taken in fluorescent lighting with white balance adjusted, no editing

If you take photos in natural light or use white balance in fluorescent lighting, you can avoid using your camera's flash. Flash is useful at times, but can do funny things to the depth of the photo. I generally try to avoid flash, whenever possible, and opt for natural light or white balance.

PHOTO EDITING

Photograph taken in natural light


Same photo using Picassa's 'I'm feeling lucky' feature and a smidge increase of 'fill light'

I can't say enough about increasing the fill light. This feature livens up colors and takes away heaviness in a photo. Adding the right amount of fill light makes it appear as if the picture was taken on a beautiful sunny day, which is always a good thing.

ONE MORE PIECE OF ADVICE

One other thing I do when I take photos for my blog is to take lots of shots from different angles and placements. The more photos I take, the more likely it is that one will be spectacular. Plus, using a digital camera means that you can delete all of the files that aren't any good.

I hope these tips help you improve your photographs. It doesn't take that much extra time to rejuvinate a picture and the results are definitely worth it.

A FEW OTHER REFERENCES

Etsy put together this nice video on how to take good photos. It's geared toward Etsy sellers, but the principles are the same.

Diane Gilleland of CraftyPod put together a very nice eBook on making a great blog, which has a good section on photography. It's not free, but also contains lots of valuable information on blogging.

Wednesday, June 17, 2009

Sewing A Shirred Dress

Ever since it got warm here in Madison, WI, I've had dresses on my mind. This soon led to pondering how to make a very simple, summery dress using my small stash of cotton fabric. I thought that a shirred dress would be the simplest to make (it is just a big tube with rows of elastic near the bust), but I did not know of an easy way to sew in all of that elastic. Enter CRAFT blog's recent post on elastic thread!

And since I found the included video to be so helpful and interesting, I'm posting it here for you!


Expect to hear more about this as soon as I acquire some of this magic thread!

Friday, January 23, 2009

Tutorial: Jog-less Stripes

To go along with my recently self-published pattern, Walking Stripes, I put together a basic tutorial on how to achieve jog-less stripes in the round. This tutorial will demonstrate a four-color stripe, though it is relatively easy to change this number once you understand the concept.

For this tutorial, you will need:
*Four balls of yarn of the same weight in different colors
*5 dpns (or a long circular needle for magic loop) in the corresponding size


To start with, cast on the desired number of stitches in your main color (MC). I cast on 48 stitches, which is a nice multiple of 4 colors and 3 'buffer' stitches (explained later).

Work a short cuff; this gives a little smoother transition into the striped section. I knit a *K1,P1* rib for about an inch.


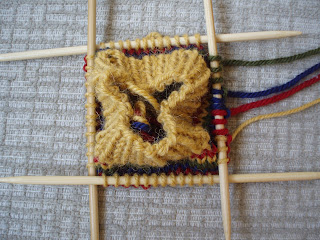
Now you will begin to set up your striped section. Knit the first 25% of the stitches in MC--in my case this fraction is 12 st. Pick up contrast color 3 (CC3) and knit the next 25% of the stitches in CC3. Knit the subsequent 25% in CC2 and the last 25% in CC1. Your needles should look something like this:


Rotate the work until you find the tail of CC2. You are now going to layer CC2 above the stitches you just made with CC1. Using CC2, knit into all but the last 3 stitches in CC1. These are the 'buffer' stitches for CC1 which will keep the stripes from jogging. In my case, I simply knit my next 9 stitches in blue from where I dropped the tail, as if no other strange things were going on.


Find the tail of CC3. Knit into all of the CC2 stitches, leaving the last 3 as buffer stitches. You should now have 3 buffer stitches in CC1 and another 3 in CC2. In my case, I picked up my red tail and knit 18 stitches, slipping the next 6 buffer stitches to give:


Finally, grab the tail of MC and knit into all of the stitches of CC3, save 3. This will leave you with 3 buffer stitches in each color, with the remainder of the stitches in MC. In my case, I knit 27 stitches in yellow and slipped the next 9 buffer stitches out of the way.


If you look carefully, you can start to see the stripes accumulating.


Now you are ready to work your stripes. Starting with CC1, knit over all of the MC stitches except for the last three. You should have 3 stitches each in CC2, CC3 and MC, with the rest being CC1. For me, I knit 36 stitches in CC1, slipping the 9 buffer stitches out of the way.


Repeat this process for CC2, CC3, and MC, in that order. You may notice that after knitting these 4 rows, you have not made a complete circuit around the needles. By not working the entire round and leaving a few 'live' stitches in each color, you essentially prevent the your stripes from jogging. All of my buffer stitches have ended up one needle to the right of where they started 4 rows ago.


Laying your work flat, the stripes really start to appear.


Work the last four rows as many times as you desire, layering each stripe on top of the previous until you work is at the desired length.


To end the striped section, you will work the set-up in reverse. Knit CC1 as during the striped section. Pick up the tail of CC2 and knit into CC1. However, this time you will leave 25% of the total stitches (12 stitches in my case) as CC1 buffer stitches instead of the normal 3. Pick up CC3 and knit, leaving 25% of the stitches as buffer CC2. Repeat this for MC. This will leave you with a quarter of your stitches in each color, as in the beginning.


Work one complete round in MC, knitting over the buffer stitches of all the contrast colors, thus ending the striped section. Cut the tails of the contrast colors. Work another cuff at the end, if desired. I did another inch of *K1,P1* rib to mirror the beginning.


Cast off. Before you weave in the ends, pull the tails (both the beginning and ending) of the contrast colors snug, as this will give a smoother transition into the striped section. Finish as usual.

Questions or comments? Contact me at brineydeepdesigns_at_gmail_dot_com!