Friday, January 23, 2009

Tutorial: Jog-less Stripes

To go along with my recently self-published pattern, Walking Stripes, I put together a basic tutorial on how to achieve jog-less stripes in the round. This tutorial will demonstrate a four-color stripe, though it is relatively easy to change this number once you understand the concept.

For this tutorial, you will need:
*Four balls of yarn of the same weight in different colors
*5 dpns (or a long circular needle for magic loop) in the corresponding size


To start with, cast on the desired number of stitches in your main color (MC). I cast on 48 stitches, which is a nice multiple of 4 colors and 3 'buffer' stitches (explained later).

Work a short cuff; this gives a little smoother transition into the striped section. I knit a *K1,P1* rib for about an inch.


Now you will begin to set up your striped section. Knit the first 25% of the stitches in MC--in my case this fraction is 12 st. Pick up contrast color 3 (CC3) and knit the next 25% of the stitches in CC3. Knit the subsequent 25% in CC2 and the last 25% in CC1. Your needles should look something like this:


Rotate the work until you find the tail of CC2. You are now going to layer CC2 above the stitches you just made with CC1. Using CC2, knit into all but the last 3 stitches in CC1. These are the 'buffer' stitches for CC1 which will keep the stripes from jogging. In my case, I simply knit my next 9 stitches in blue from where I dropped the tail, as if no other strange things were going on.


Find the tail of CC3. Knit into all of the CC2 stitches, leaving the last 3 as buffer stitches. You should now have 3 buffer stitches in CC1 and another 3 in CC2. In my case, I picked up my red tail and knit 18 stitches, slipping the next 6 buffer stitches to give:


Finally, grab the tail of MC and knit into all of the stitches of CC3, save 3. This will leave you with 3 buffer stitches in each color, with the remainder of the stitches in MC. In my case, I knit 27 stitches in yellow and slipped the next 9 buffer stitches out of the way.


If you look carefully, you can start to see the stripes accumulating.


Now you are ready to work your stripes. Starting with CC1, knit over all of the MC stitches except for the last three. You should have 3 stitches each in CC2, CC3 and MC, with the rest being CC1. For me, I knit 36 stitches in CC1, slipping the 9 buffer stitches out of the way.


Repeat this process for CC2, CC3, and MC, in that order. You may notice that after knitting these 4 rows, you have not made a complete circuit around the needles. By not working the entire round and leaving a few 'live' stitches in each color, you essentially prevent the your stripes from jogging. All of my buffer stitches have ended up one needle to the right of where they started 4 rows ago.
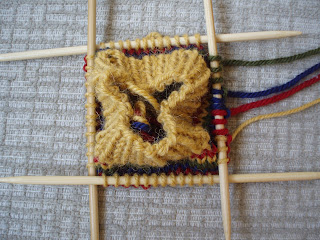

Laying your work flat, the stripes really start to appear.


Work the last four rows as many times as you desire, layering each stripe on top of the previous until you work is at the desired length.


To end the striped section, you will work the set-up in reverse. Knit CC1 as during the striped section. Pick up the tail of CC2 and knit into CC1. However, this time you will leave 25% of the total stitches (12 stitches in my case) as CC1 buffer stitches instead of the normal 3. Pick up CC3 and knit, leaving 25% of the stitches as buffer CC2. Repeat this for MC. This will leave you with a quarter of your stitches in each color, as in the beginning.


Work one complete round in MC, knitting over the buffer stitches of all the contrast colors, thus ending the striped section. Cut the tails of the contrast colors. Work another cuff at the end, if desired. I did another inch of *K1,P1* rib to mirror the beginning.


Cast off. Before you weave in the ends, pull the tails (both the beginning and ending) of the contrast colors snug, as this will give a smoother transition into the striped section. Finish as usual.

Questions or comments? Contact me at brineydeepdesigns_at_gmail_dot_com!

Saturday, January 17, 2009

Andy's Scarf

In addition to working on my vibrant knee-high socks--which I am terming the obnoxiousocks--the other project that has been keeping me busy is a scarf. A Christmas scarf for darling husband to be exact. Even though I just finished his sweater in December, he really was in great need of a new scarf. So, I put two skeins of Cascade 220 under the Christmas tree and enjoyed a couple weeks of knitting for myself in the meantime.


For the pattern, I chose a simple 8 row basket-weave; interesting to knit but not too feminine. About 6" into the scarf, however, it started to curl (damn!), and by the time I was done, the scarf looked like a palmier cookie (double damn!). So I did something I've never done to a piece of my knitwear--I ironed it.


As you can see from the pictures, the ironing worked out really well. The scarf is flat and even the pattern looks better. As long as you are careful (medium heat, moderate steam, and using a fairly light touch), I'm now of the opinion that ironing actually works better than blocking for some knitwear. But finishing aside, I just hope that my husband likes the scarf and it will keep him warm during the frozen Wisconsin winters.

Sunday, January 11, 2009

Cranberry Cordial and Vanilla Liqueur

I've been making an effort in the last couple months to consistently blog here once per week. And while the amount that I knit has not correspondingly increased, the more frequent posting allows me to showcase some of the other creative things I am working on. For example, today's non-knitting post highlights my homemade cordials.


I made my first cordial this summer after seeing a recipe for Rhubarb Schnapps in Nigella Lawson's delightful, but poorly named book 'How To Be A Domestic Goddess'. Very pleased with the results, I soon acquired the book 'Cordials From Your Kitchen', which contains a wide range of recipes for cordials and liqueurs. The cranberry cordial and vanilla liqueur, seen above, are my first two batches from this new book. They both have another month to steep, and probably another month to mellow after I strain out the solids, but I can't wait to see how they turn out!

Sunday, January 04, 2009

Husband of the Year

I have the best husband ever. I think he took the hint from the sweater I made him and decided that I really like to knit. Or perhaps it was the yarn spilling out of the closet or the incessant clicking of the needles that persuaded him to buy me more yarn for Christmas. And not just any yarn, a monthly sock club!


My first package was waiting for me when I returned home from my holiday vacation, and I am very pleased with it. The yarn is Cascade 220 Superwash Paints that looks like it has been very subtly kettle dyed a bright red color. I plan to ignore the enclosed pattern entirely and use my just-purchased copy of Sensational Knitted Socks to make a pair of socks for myself.


And speaking of socks, my knee-high rainbow socks have hit the needles. The winning stitch pattern was a 2x2 rib, pooling be damned. The foot looks very neat but we'll see how the pooling changes once I reach the calf (which should be soon, as these socks are working up really quickly). In the meantime, I'm in search of a good adjective to describe these socks. Lurid? Obnoxious? Vibrant? With a little more work on the socks, I'm sure the right word will come to me.